Printing Photographs


Using photo applications allows you to make borderless (full page) prints easily from the images you taken with your digital camera.
 The photo applications are included on the Setup Software & User's Guide CD-ROM that comes with the printer. Windows users can install Easy-PhotoPrint and Macintosh users the ImageBrowser program. Just go to
Quick Start Guide
and follow the instructions.
 This chapter describes only the steps used to print from photo applications using the Borderless Printing mode. Refer to the guidance on the screen after starting the program for Easy-PhotoPrint and the
Photo Application Guide
for ImageBrowser for a full description of the various features, options and points to note included with the photo applications.
 Printing photographs with Windows
Follow the simple steps below to create prints of digital camera photographs with Easy-PhotoPrint using the Borderless Printing function. Easy-PhotoPrint supports Exif Print (Exif 2.2).
 The image captured with an Exif Print-compliant digital camera can be optimized using data, such as camera settings (white balance, exposure time), etc., stored at the time of shooting, yielding extremely high-quality prints.
 Easy-PhotoPrint can handled only JPEG files (filename extension: .jpg and .jpeg).
(1) Insert the memory card in the computer.
This chapter describes only the steps used for printing the photographs stored in the card. We recommend you consult your memory card documentation for instructions on how to set the memory card in the computer.
(2) Click
Start, select
All Programs (or
Programs),
Canon Utilities,
Easy-PhotoPrint, and then
Easy-PhotoPrint.
The
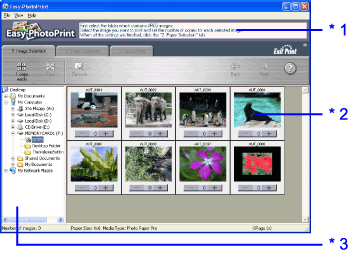
1.Image Selection sheet is displayed.
(1) Select the folder containing the photograph you want to print. (Select memory card folder, then the folder containing the digital photographs.)
All photographs in the selected folder are displayed.
*1 Guidance
*2 Thumbnail
*3 Folder window
(2) Click the [+] button on the thumbnail of the photograph you want to print and specify the number of copies.
*1 The number of copies increases.
*2 The specified number of copies displayed.
*3 The number of copies decreases.
(1) Click the 2.Paper Selection tab.
(2) Select the size of the paper you use from Paper Size.
(3) Select the type of the paper you use from Media Type.
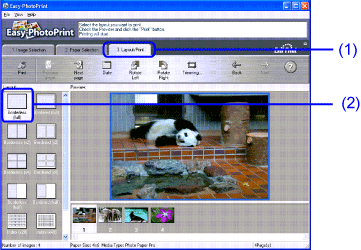
(1) Click the 3. Layout/Print tab.
(3) Load the media type specified in the 2.Paper Selection tab.
(4) Click
Print.
Borderless printing of the specified photograph will now begin.
 Printing photographs with Macintosh
Follow the simple steps described below and learn how to create color prints of digital camera photographs with ImageBrowser using Borderless printing.
(1) Insert the memory card in the computer.
This chapter describes only the steps used for printing the photographs stored in the card. We recommend you consult your memory card documentation for instructions on how to set the memory card in the computer.
(2) Double-click the Canon ImageBrowser(alias) icon on the desktop.
If the Canon ImageBrowser icon is not displayed on the desktop, open the Canon ImageBrowser folder, in which the ImageBrowser program has been installed, and double-click the ImageBrowser icon in the folder.
(1) Select the folder containing the photograph you want to print. (Select memory card folder, then the folder containing the digital photographs.)
All photographs in the selected folder are displayed.
(2) Click the photograph you want to print.
(3) Click PRINT and select Layout printing from the pull-down menu.
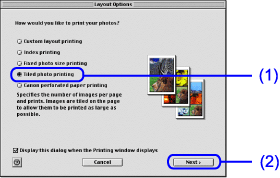
The Layout Options dialog box appears and layout selection wizard starts.
(1) Select Tiled photo printing.
(1) Select Borderless Printing by clicking the check box.
(2) Select a paper size from the
Paper Size pull-down menu.
The menu only displays those paper sizes compatible with Borderless printing.
A message box pops up, displaying the information about printing. Read the message and click
OK.
This returns you to the
Layout Options dialog box.
5 Specify the number of photographs to print on one page.
(1) Select 1(1x1) from the No. of images pull-down menu.
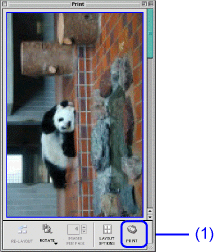
The Print dialog box is displayed.
(2) Select a type of media for printing from the Media Type pull-down menu.
(3) Select Photo from the Print Mode pull-down menu.


